Showing posts with label Tips & Sips. Show all posts

Monday, November 9, 2015

Cuccio Royale Collection, Fall 2015

Good morning friends!  I've got a good and somewhat lengthy post for you today.  Way back when I was having the time of my life in Las Vegas and rubbing elbows with all the nail polish peeps, I got to meet some lovely folks representing the Cuccio brand.  Now I knew this brand already because I am a fan of their body butters and cuticle sticks.  I also knew they made polish because I'd seen a few of their gels in my local beauty supply store.  Well what I wasn't expecting was to see this (and another) stunning collection displayed at the Tips & Sips event!  The Royale Collection is Cuccio's answer to the Fall season and it's pretty dang perfect!  Rich cremes, shimmery jewel tones and even a multichrome!  While browsing around the Cuccio website I wasn't able to find this collection, but I did see it available on HB Beauty Bar for $8.50 each.  But keep checking the Cuccio website because I'm sure the Royale collection will be available soon.

*press sample*


This is a long post so I'll try to keep each individual blurb short and sweet.  This is Count Me In, a smokey, purple creme.  The formula was creamy and buttery.  I had full coverage in 1 coat of Count Me In.  No topcoat used.  

Cuccio Colour Count Me In

Friday, August 14, 2015

The Painted Nail Tubular

Good morning loves!  How's your Friday?  Mine is lazy.  I want to do something with the kids since it's their last Friday home, but my middle just left to go to work with daddy and the other 2 are in their pj's still (ok I am too).  So I am just lazing here at the table drinking coffee and typing and browsing and texting.  Tough life, right?  Today I have an uber bright neon from The Painted Nail to share with you.  I picked this up from the Tips & Sips after party while attending CosmoProf.  This event was put on by Katie Cazorla, The Painted Nail herself!  It was a really nice event with a mix of mainstream and indie brands.  Katie is adorable and very nice.  She spent time chatting with Michelle and I and we snagged a picture with her too!  Ok, back to polish, I have a neon from her new (?) collection to share with you today and this is really eye-searing bright!  I've been browsing around but I can't figure out how to purchase these online - it's possible they are only available in her salon.  So let's jump in and take a gander at Tubular!

*press sample*

The Painted Nail: Nail Bar, Facebook, Instagram, Twitter

I wanted to share the picture I have with Katie and Michelle!  Katie was so cute and personable.  She chatted it right up with us like we were old friends reunited.  Her upbeat personality was catching and the whole party was a fantastic time!  

Tips & Sips 2015; My Nail Polish Obsession, The Painted Nail, Ehmkay Nails

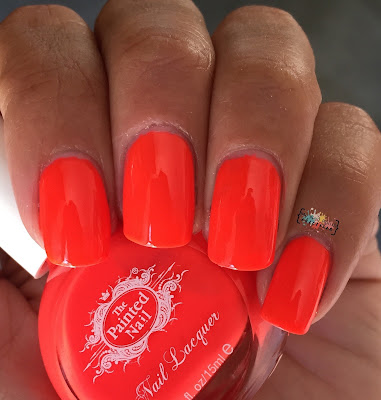
So this is Tubular!  It's an uber neon, burn your eyes bright orange creme!  My pictures are showing it more red than it is but when you get to the shade pictures you will see that it's definitely orange.  I love this color.  It's my go-to neon shade and Tubular doesn't disappoint on any front.  Color, formula and application were all aces.  Tubular is really opaque, it was thisclose to being a one coat polish.  I added a second coat for good measure.  I finished with a layer of topcoat for a smooth, glossy finish.    

*direct sun*
The Painted Nail Tubular

The Painted Nail Tubular

The Painted Nail Tubular

 *shade*
The Painted Nail Tubular

The Painted Nail Tubular

 *indirect natural light*
The Painted Nail Tubular


Pin It
Instagram

Tuesday, July 21, 2015

Mini Mani Moo Liquid Tape Review

Good morning lovelies!  Hope you are having a wonderful Tuesday.  Today I have a review of a product I was introduced to at the Tips & Sips Cocktail after party while I was in Las Vegas for CosmoProf.  I hadn't heard of Mini Mani Moo before but I am familiar with liquid latex and it's use for all things nail art.  The company, based out of Texas, is all about making nail art easy for everyone.  Not only can you use the Liquid Tape for easy nail art clean up, you can also use it as a peel off base coat (I haven't tried it this way yet).  Mini Mani Moo ships worldwide (some restrictions may apply).  Not only is Liquid Tape available on the Mini Mani Moo website, but you can also pick up polish, stampers, water decals and topcoat.  Mini Mani Moo can be purchased on Amazon ($8.90) and the Mini Mani Moo website ($9.90).  Let's jump in and check this stuff out!  

*press sample*


So here's Liquid Tape.  It's much like other liquid latex products that are currently available on the market.  What makes it different is 1 - it's applicator and 2 - it's scent.  I haven't seen a doe foot applicator and I found it very easy to use.  I had more control over where the latex went on my fingers.  I think I need to practice with it again and use a heavier hand applying it as I feel I didn't have enough latex on my fingers and ended up cleaning up more than I wanted to with acetone.  The scent when wet is the typical latex smell, but not overly powerful.  But once dry it smells like coconut - very pleasant.  The 2 things I would recommend to a Liquid Tape user are to swipe on a nice heavy layer to make sure everything is covered well and to make sure to not get any on your actual nail (if you are only using it for easy clean up) because you will pull up the polish - as I did in a few places.  Other than those 2 user errors I did enjoy Mini Mani Moo Liquid Tape.  It's ease of use and availability on a huge reseller like Amazon make it an easy choice.  It's very affordable as well.  I will definitely be using Liquid Tape again!  

Here's a bottle shot of the product.  Don't mind my polish-messy towel, that thing gets good use during nail art and swatching time.  

Mini Mani Moo Liquid Tape

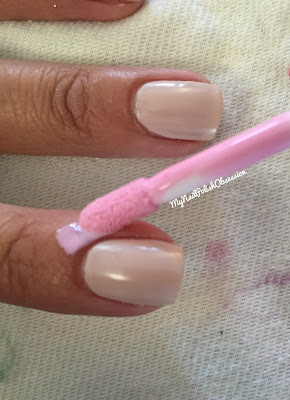
Here's a nice pic of the doe foot applicator.  It was very easy to work with, I didn't have any latex end up pooling in my cuticles which was nice.  

Mini Mani Moo Liquid Tape

The next 2 pictures show, again, how easy the doe foot applicator was to use.  I'd suggest getting more product on the applicator OR going over your skin twice to ensure everything is covered well.  

Mini Mani Moo Liquid Tape

Mini Mani Moo Liquid Tape

Here's the gradient ready to go on the sponge applicator and the actual application.

Mini Mani Moo Liquid Tape

Mini Mani Moo Liquid Tape

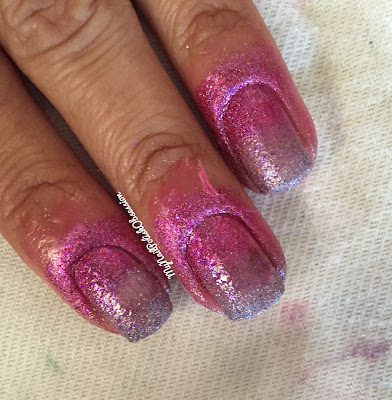
First layer of of the gradient is very light and sparse.  I went over a few times to darken things up and completely cover my nails.  But you can already see how the Liquid Tape is going to save me from endless glitter clean up with a brush and acetone.  

Mini Mani Moo Liquid Tape

Completed gradient.  Messy fingers.  Let's see the clean up.  

Mini Mani Moo Liquid Tape

The next 2 pictures show how easy it is to just peel the Liquid Tape off.  You simply lift up the Liquid Tape at an edge and continue to pull it off.  You can use tweezers to peel it off or just your finger.  It's very easy to remove.  

Mini Mani Moo Liquid Tape

Mini Mani Moo Liquid Tape

And here's my gradient, all the Liquid Tape is off.  You can see a few spots that still have polish on them - as I mentioned before, I should have put on a thicker coat or doubled up.  But the amount of clean up is nothing compared to what it would have been if I'd done the gradient on my bare skin!  

Mini Mani Moo Liquid Tape

And just so you can see what the finished gradient looks like in the sunlight - sparkly, pretty and clean!  

Mini Mani Moo Liquid Tape

Pin It
Instagram