Tuesday, June 4, 2013

Dior Sunnies

Good morning polish friends!  Here's the change of color I promised....Dior Sunnies.  You know I can't pass up a Dior, or a pretty red-orange, orange, pink or coral color.  So alas, the new Summer Mix 2013 collection will be the end of me.  It was nice knowing you.  (I kid).

Sunnies is a gorgeous color, though it's quite hard to pinpoint.  After checking with diorpress.com they describe Sunnies as the color of litchi.  After looking up litchi I still think it looks like ripe papaya.  Looks about as juicy as ripe papaya too.  Yum.  The formula is nice and creamy with that lovely smidgen of shimmer.  Nothing to report in regards to application….it's on par with all the other Diors I have reviewed, like buttah.  I used 3 coats and 1 layer of topcoat. 


Pin It
Instagram

Monday, June 3, 2013

Literary Lacquers Green Gables Collection, Part 1 - The Holos!

Sorry for the late night post polishes dears…but I had to share these NOW!!  Not in the morning, NOW!  Plus I have more to share tomorrow!  Literary Lacquer is coming out with a new collection, Green Gables inspired by Anne of Green Gables by Lucy Maud Montgomery.  There are holos, glitters and shimmers and they are all amazing!  Amy really did an amazing job with this set.  I am going to show you the holos first (big surprise since you know how much I love ze holos).  Tomorrow I will share a glitter and a shimmer, be sure to stay tuned for those too.  

Before the review here are the details on the Green Gables collection.  This set of 6 polishes will be available on Wednesday 6/5 at noon Mountain time.  Full size bottles are $10 each, but you can buy the entire set at a discounted price of $55.  You can purchase the Green Gable collection (or individual bottles) at the Literary Lacquer Etsy shop.  Be sure to follow Literary Lacquer on Facebook for news and updates!

And now on to the polish!  Up first, the collection namesake Green Gables.  Amy describes Green Gables as a "mid-toned grass green linear holo."  Spot on.  Absolutely reminds me of grass.  But the prettiest dang grass I have ever seen.  I wish my lawn looked like this.  Green Gables had a great formula with a slight jelly-like squishiness.  It was easy to apply with issues to report.  Green Gables was on the sheer side, the pictures below show 3 coats and there is still a slight visible nail line.  I did not use topcoat.  


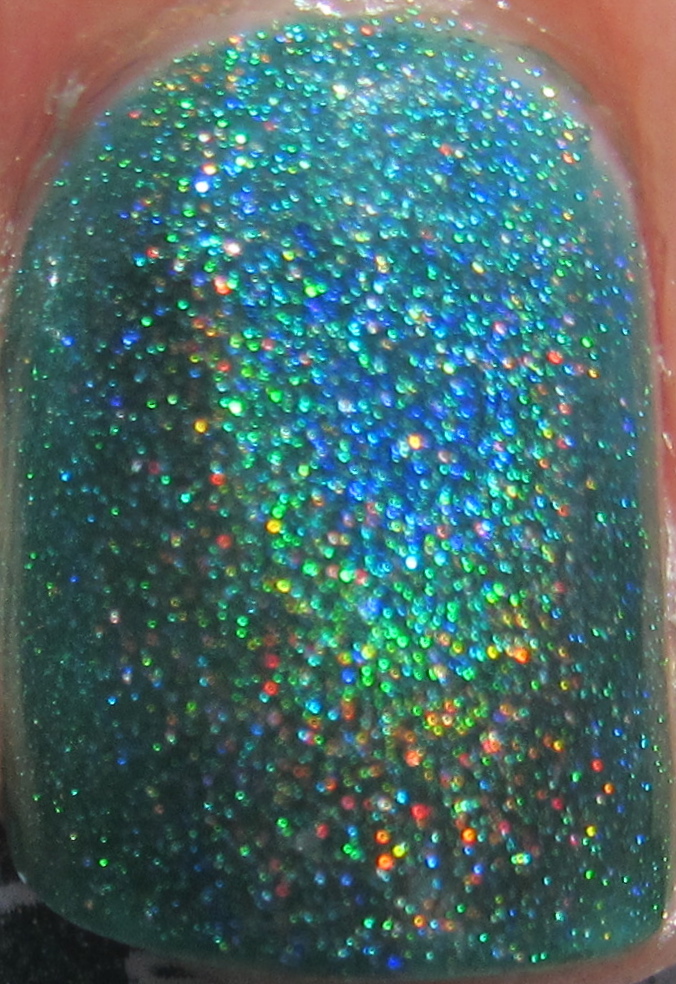
The other holo I was sent to review is Lake of Shining Waters.  Amy describes this one as a "murky teal linear holo."  I call it gorgeous.  Lake has the same formula as Green Gables, jelly like and squishy.  Application was also the same.  The only difference I can point out in regards to application/formula is that Lake was a tad more opaque and completely covers the nail in 3 coats.  There is no visible nail line.    I did not use topcoat.  


Thought I'd toss out a quick little comparison of Green Gables and Lake of Shining Waters.  They are not the same, not even close.  So if you love holo like I do, the best bet is to get both.  You can thank me later.  


*these polishes were sent for my honest opinion and review

Pin It
Instagram

The Nail Junkie Fish

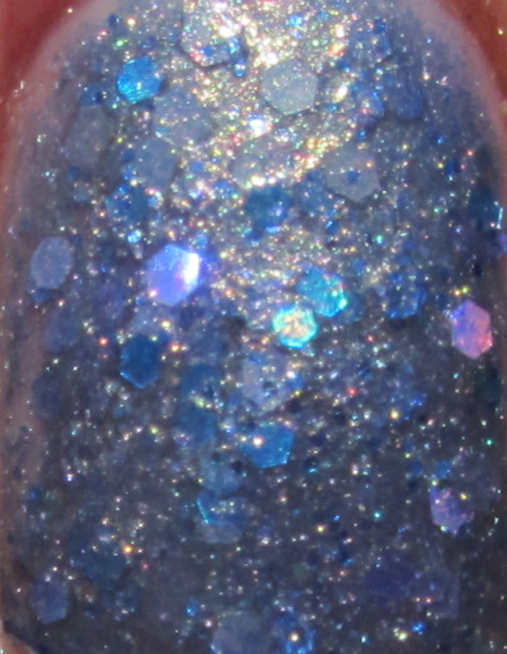
Hi polish friends!  Ok ok - one more blue post then I'll do another color, promise!  But I couldn't resist sharing this one because it is so sparkly and fun!  And with Summer on our heels I can't stop thinking about swimming, pools and the beach!  So let's delve into the water!

This is The Nail Junkie Fish.  It's so pretty and shimmery and I HAD to wear it for my daughters swim lessons to check it out in the water.  It didn't disappoint.  In the sunlight it's a metallic blue with gold and holo shimmer.  There are also blue and holo hexs that are very sparkly and lovely.  Under the water the combination of color, glitter and shimmer comes alive!  Aleta truly captured the look of fish scales.  With every hand movement there was sparkle and shimmer as if a fish was zipping past me.  I love this polish both on dry land and submerged.  I used 2 coats of Fish and it had great application.  The formula was nice and easy to work with and it was smooth to the touch after 1 layer of topcoat.

I would have loved to share underwater Fish pictures with you but it's hard to hold a camera and a toddler in the water lest the camera fell in.  You'll just have to trust me and buy a bottle for yourself to try it out.  Here's how you can follow The Nail Junkie:  Facebook, Instagram (thenailjunkiepolish), BlogEtsy.


Pin It
Instagram

Sunday, June 2, 2013

Chanel Azure & Lynnderella Mermaid Magic

Hello polish friends!  I'm pretty excited about this mani!!  It's Chanel Azure from the new L'été Papillon De Chanel Summer 2013 Collection.  Azure is a stunning metallic teal-blue that has some shifting properties to show a bit of green and deeper blue!  Hello pretty lady!  I put on 2 coats of Azure and had perfect application.  I paired it with Lynnderella Mermaid Magic, a gorgeous glitter mix of blue, aqua and purple.  Can you believe that I won Mermaid Magic and another fab LE from the Love Lynnderella 2,000 Likes Facebook page!?  I am a seriously lucky girl!  I used 2 coats of Mermaid Magic.  I used 1 layer of topcoat for shiny and smooth to the touch nails.  Paired together I really did feel like I was a mermaid!  Breathtaking!

*on a side note, my topcoat had gone a bit thick and turned wonky - it gave me horrible shrinkage and it happened so quickly I literally watched it happen.  Thanks for ruining a perfectly lovely mani topcoat.  Pbbbbbtttttt!

**on another side note, Mermaids ARE REAL!  LOL.  Yeah, I watched the Animal Planet special.  


Pin It
Instagram

Saturday, June 1, 2013

Illamasqua Cameo, Noble & Nomad Using the Plastic Wrap Method!

Hello polish lovers!  I attempted the plastic wrap method for the first time with this mani.  It was easy and came out quite pretty if I do say so myself!  I used some lovely Illamasqua colors: Nomad, Cameo and Noble.  Gorgeous mani and 3 untried used!  Boom!

I started this mani with Illamasqua Cameo, a gorgeous cornflower blue creme.  It went on like a dream and I used 2 coats for a nice solid base.  I then used the plastic wrap method and dabbed on 1 coat of Noble, which is a lovely light aqua cream.  I did the same with Nomad, a medium mint creme.  Noble and Nomad also have that wonderful Illamasqua formula that apply like butter.  I finished with 1 layer of topcoat.  Doesn't it look like little Earth's from space?  I love how it turned out and I will definitely do this again because it was easy yet so interesting to look at.
I know there are YouTube video tutorials showing how to do this, but I've read enough blogs and seen enough mani's to know what to do on my own.  But just in case, here is how I did it.  I started with 2 coats of base color and let it completely dry.  I then poured a tiny bit of polish out onto a paper plate.  I cut a small square of plastic wrap (maybe 2" x 2") and balled it up into a wrinkly mess.  Next I dipped that wrinkly ball of plastic wrap into the polish and then dabbed it onto my dry nails.  I did that 1 time with each color.  Don't move the plastic wrap around too much or you will blend the colors too much and get a blob of mixed color…you want the individual colors to stand out on their own.  And Viola!  You now have a plastic wrap mani!

Let me know if you liked this mani and if you have tried (or will try) it yourself!  You can purchase Illamasqua polish from Sephora or Illamasqua.


Pin It
Instagram